The windows are an abundant space to work. You can work on your study materials, pay your bills, prepare for exams, shop online, edit pictures, etc.
These windows can update themselves, which is known as the auto-updating option. It is a really great feature unless it happens when you are in the middle of working on something in your system.
This will make you lose all the data and files you were working on previously if it suddenly starts the update out of nowhere.
Fortunately, there are so many ways that will give you the hands in the time of need.
How to Turn Off Automatic Updates on Windows 10:
There are many proven ways to disable the auto-updating option in your windows 10. They are as follows:
- Disable by Settings
If you find it hard when your system starts the auto-update while you are working but you are afraid of losing all the built data but no worries anymore.
You don’t even have to delete all the auto-updating options permanently. In its place, you can change the settings of the windows that allow you to stop the update for a specific period of time. You can pause it for around 35 days in your windows 10.
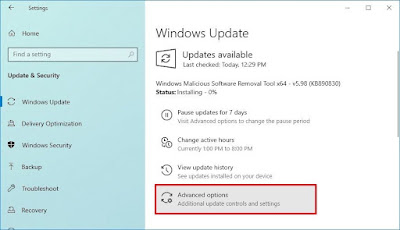
You just have to follow some simple steps, such as opening the settings and finding the update and security option.
And then, you have to click on the windows update and then go for the advanced options listed on the windows update.
There, you will have the “pause until” section, which enables you to access the menu. Finally, select the number of days option to stop the updates for a specific period of time you want them to be paused.
Once you have paused the updating option, then your windows update until there is no longer downloaded for the time you specified. And when the windows reach the time limit that you have set, you should install the latest patch available to enable the auto-updating option available again.
But it is always possible to undo all the settings discussed before. Otherwise, you can achieve the same effect by choosing the “Resume updates” button.
Also Read >>>> Top Data Recovery Software
- Disable by Group Policy
In windows 10, you can use the local group policy editor in order to disable the auto-update option permanently.
You can also change the settings of the update when you have to install the patches on your system. To disable the auto-update, you have to open the start option.
Then you have to search gpedit.msc and then the result that appears at the top for launching the local group policy editor in your windows.
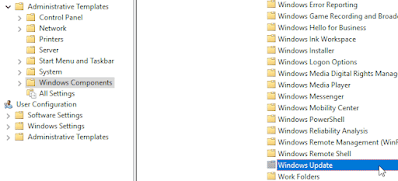
Then navigate to the Computer Configuration, then the Administrative Templates, which will lead you to further options.
In that, you have to choose the Windows Components and then click on the Windows Update.
After all these, you have to double-click the Configure Automatic Updates policy on the right side of the window pane.
Look for the disabled option to permanently turn off the automatic Windows 10 updates. Once it is all done, click the “Apply” button. Then you have to click on the OK button that will pop up afterward.
After completing these steps, your Windows 10 will stop downloading the updates automatically.
But you will have the option to check the new updates whenever you wish for it by manual process. It is available on the “update and security” that comes under the settings option. You can “check for the updates” button to get the most recent patches that are available at present.
It will be well enough to disable the unwanted options. But it is important to select the “Not Configured” option.
Also Read>>>> What is Touch Bar Pet and how to get it on Your Macbook Pro?
- Disable by Registry
You have to be very knowledgeable while editing the Registry, because it is quite risky. It can cause irretrievable damage to your system if you don't do it correctly.
So before starting this procedure, it would be best if you could make a full back up in your windows 10. And to disable the auto-updates forever, you should edit the registry using the following instruction.
Like any disabling options, you have to open Start, search for Regedit and click the result that appears at the beginning to launch the Registry Editor. Then you have to connect these options one by one.
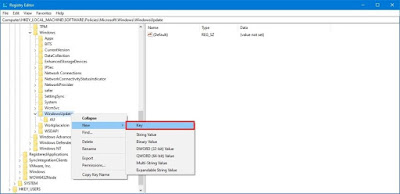
Firstly, “HKEY_LOCAL_MACHINE,” then select “SOFTWARE,” it will lead you to “Policies,” in that go for the “Microsoft” and finally, “the Windows.”
You have to select the new submenu that appears when you right-click the Windows folder key, and you should choose the Key option. After this, you might have to rename the “new key Windows Update” and press the enter button.
Then you have to Right-click the newly created key, it will take you to the new submenu, and at this time, you choose the Key option. In this part, you have to name the new key AU and press Enter.
Again, Right-click the AU key and select the new submenu and go for the “DWORD 32-bit Value” option and name the new key “No Auto Update,” and press Enter.
- Restart the computer
After finishing all these steps, your automatic updates will be disabled permanently on your system. If you want to undo the changes, you can use the guidelines delineated above, but remember to right-click the Windows Update key and select the “Delete” option.
Then you might have to reboot the system to apply the settings. But consider that the Windows Update is another essential windows service that can be turned off in a related method to the other services. Nevertheless, you can obtain information about recent updates when you check the security settings when needed.
Winding it up:
If you are aware of these instructions, then it becomes very easy to disable the auto-updating setting. However, if you have important files that are never meant to be lost, you must really be careful while performing these steps. It is because if you miss any steps from the following guidelines, then you can lose all the files or data that is saved in the system. So, undertake the action with caution.
Other Articles:
How to Remove Avast Signature From Gmail?
What is Windows Virtual Desktop?
Difference between Active Directory and Azure Active Directory?


No comments:
Post a Comment