In Windows 10, do you have 100 percent disc usage? If not, your PC has been hung up and stopped.
Insufficient and full storage is one of the most typical concerns for any device with a reasonably small amount of storage. This is a bad situation for everyone with a computer and smartphone.
You will be unable to save any additional data on your storage device. You may need to buy another storage unit and connect a new hard drive.
However, there are a few more options for resolving your PC's 100% disc usage issue. Here you will see how you can resolve your computer's 100% disc usage:
1. Restart your system
You are well aware that restarting your computer can often solve various problems. Your 100 percent disc usage issue in Windows 10 is no exception. While this approach may not help you determine what is causing the problem, it may be enough for you if it goes away.
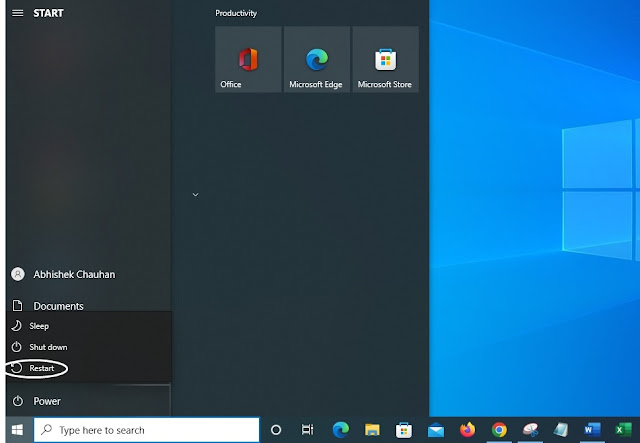
• Press the start button.
• You can choose a Shut down > Restart from the Shutdown menu.
• You may have solved your disc problem after restarting.
2. Update Windows 10
Microsoft provides Windows 10 updates regularly to correct bugs and plug security issues. These updates should be installed automatically, but if you do not have the most recent version, updating Windows 10 can help you fix many problems.
To upgrade to Windows 10,
• Go to the Start menu and then click Settings from the drop-down menu.
• Select Updates and Security and start the update from there.
• The problem should be resolved after your computer has finished and restarted.
When Windows updates, it replaces tens of millions of files, which causes everything else to slow down.
Because Windows is in the middle of updating, you may observe 100% disc uses in some cases. Windows may even become unresponsive in some cases.
Windows updates normally download and install automatically in the background.
Windows may have started the update process if your disc utilization suddenly increases. When you go to Start > Settings > Updates and Security in such a case, you will find that the Windows update is in progress:
Wait until Windows has finished installing and your disc use should return to normal.
If you find up-to-date displays, you will need to figure out what else could be causing Windows 10 to use up all of your disc space.
3. Disable Windows Search
Windows search displays index files on your system so you can find it quickly. This search may use a lot of disc space in some cases.
You can disable Windows search to see whether disc usage decreases to determine what is causing your 100% disc usage.
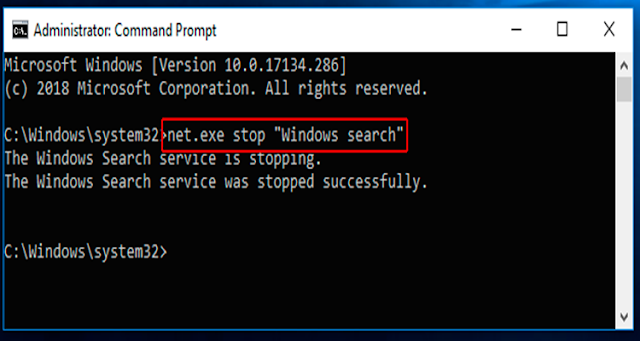
• In the Search bar, you can type the command prompt, right-click it and select Run as Administrator.
• Stop Windows Search with the command net.exe.
• As a result, you will know that your Windows search service has been successfully disabled.
• If your disc use problem has been rectified, then press the "Windows + R" key on your keyboard to permanently disable it.
• A small run tab on-screen will occur, and you must now type services. msc and then click OK.
• Look for Windows Search and click on it to open it. Under the general menu, look for the Startup type option and change it to Disabled.
• If you want to save the changes, click Apply and then OK.
4. Check for Malware
Your computer could be infected with malware, which is causing the increase in disc usage.
If antivirus software was operating in the background, it should have recognized the problem.
However, nothing is perfect, so make your antivirus software analyze your hard drive for a possible infection. Because your drive is already overloaded, this could be time-consuming, but finding and removing unwanted software may be important.
Also Read >>>> How to Turn Off Automatic Updates on Windows 10?
5. Stop the Superfetch Service
Service Host Superfetch can easily create effective disc use if your system does not have the latest hardware. Superfetch works similarly to drive caching by moving all of your commonly used files to RAM.
This feature allows the software to start up more quickly. This service's high disc utilization is not usually a problem.
You can disable this service to fix the Windows 100 disc utilization issue.
• In the Windows 10 search box, type Run or press Windows + R.
• Click the OK button after typing services.msc into the Open box.
• Now look for Superfetch. Right-click it > choose Properties
• Choose Stop from the pop-up menus > choose Disabled from the startup type drop-down menu.
6. Change choices from balanced to high performance
For many users, this change in energy settings appears to have succeeded, as they have reported 100% disc use on Windows 10.
Follow these steps:
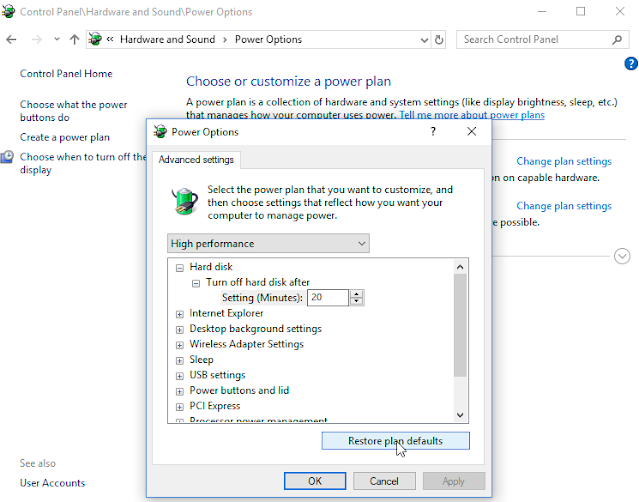
• Change plan settings by going to Power Options > Change plan settings by going to Power Options.
• Change plan settings by going to Power Advanced. Power settings can be changed.
• Ensure that the High-performance option is selected from the drop-down box and that all plan options are left at their defaults.
7. Temporarily Turn Off Your Antivirus Software
When trying to figure out what is causing your Windows 10 100 percent disc usage problem, switch off your antivirus software for a while.
Check to see whether this reduces your disc usage. Even Windows Defender can cause issues by raising I/O and network traffic, possibly leading to excessive disc usage.
If this is the case, you might consider switching antivirus products.
Also Read>>>> Windows 11 Price Updated [2022], New Features and Upgrade Availabe
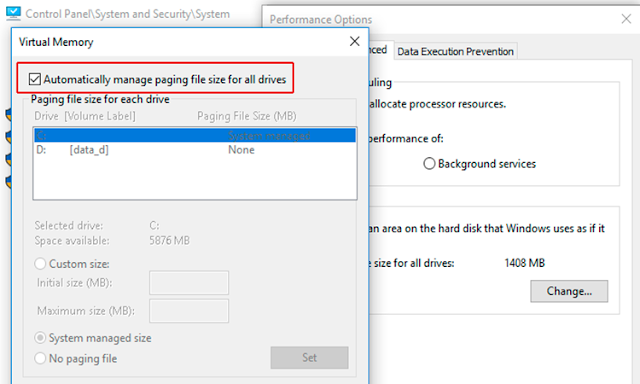
8. Reset Virtual Memory
It is a memory management approach for your system that connects your hard drive remotely to boost your system's performance.
This strategy requires an individual to read or writes from the hard disc, resulting in disc usage.
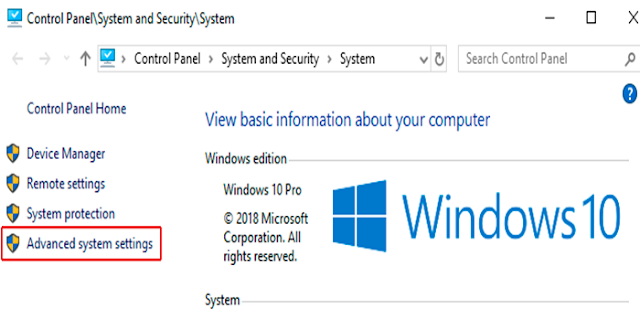
• Right-click on any space to rest your virtual memory head towards This PC.
• Choose properties from the drop-down menu, and then choose Advanced System Settings.
• When the system properties dialogue box appears, select the "advanced tab." Select "settings" from the advanced menu.
• The performance options dialogue box will appear, and the "advanced tab" will be opened again.
• Uncheck the automatically manage paging option and select "Customize Size." The initial size should be the same as your recommended size.
• Enter the appropriate quantity based on the size of your RAM. For 4GB RAM, select 6144; for 8GB RAM, select 12288 or select No paging File and click OK.
Also Read >>>> What is Windows Virtual Desktop?
9. Run Disk Check
Disk failure may be caused by 100% disc usage. As a result, you should run the check disc tool to ensure everything is in working order.
• Open This PC to do a disc check. Choose properties from the right-click menu on any drive.
• The Tool Tab will appear in a new dialogue box.
• Under the Error Checking option, select Check.
• It will perform a scan and look for faults. If an error is discovered, it will suggest that you correct it.
Also Read >>>> How to Speed up Windows 10?
10. Fix Google Chrome
Suppose you have noticed that your Chrome is running slowly. This occurs as a result of 100 percent disc usage.
However, you can avoid such issues by altering specific Google Chrome settings.
• Select "settings" from the three dots in the right corner menu.
• Then choose Cookies and other site data from the Privacy and Settings menu.
• After scrolling down, turn off the toggle for Preload pages for faster browsing and searches after scrolling down.
• You may notice slower browsing, which will resolve your disc use issue. If not, turn on the toggle.
Also Read >>>> How to Manage Multiple Windows On Mac OS?
Bottom Line
Hopefully, the above-mentioned top ten points will help you resolve all the possible causes of 100% disc use.
Uninstall software you do not need, clean up data, and ensure background processes are not bogged down to avoid this happening again.



No comments:
Post a Comment