Causes of GeForce Driver Installation can’t Continue
Due to some reasons, GeForce Game Ready driver installation can’t continue. Well, some common causes are summarized as follows.
• Antivirus or malware apps interfere with the GeForce Experience.
• There’s no enough space for the latest driver update.
• The current driver doesn’t support the graphics card.
• There are some issues with the installation files of GeForce.
• The operating system is not compatible with the driver you want to install.
✔️ Solution 1: End All Nvidia Processes
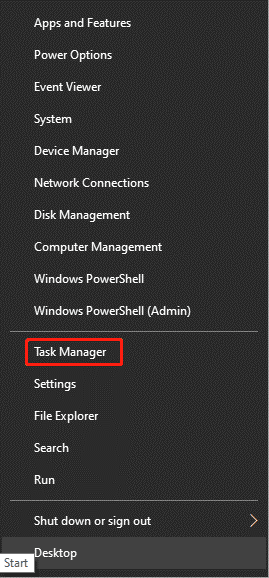
Step 1: Right-click on the Windows icon on the desktop and click Task Manager from the prompted menu.
Step 2: In the Task Manager window, find and right-click on the Nvidia process and click End task. You should repeat this operation to kill all processes related to Nvidia.
Step 3: After that, restart your computer and check if the GeForce installation cannot continue still.
✔️ Solution 2: Disable Antivirus Services on the Computer
Malware or antivirus apps on your computer may also interfere with the GeForce driver installation too. To get the GeForce Game Ready driver installation can’t continue issue fixed, you should add GeForce files to the exclusion list or disable antivirus services on the computer.
The following steps show you how to do that on Windows Defender Firewall. For third-party antivirus programs, open their settings and disable them.
Step 1: Press Windows and I keys at the same time to open Settings.
Step 2: Click Update & Security > Windows Security > Firewall & network protection.
Tip: To disable Firewall, click Virus & threat protection > Manage settings and then turn off Real-time protection.
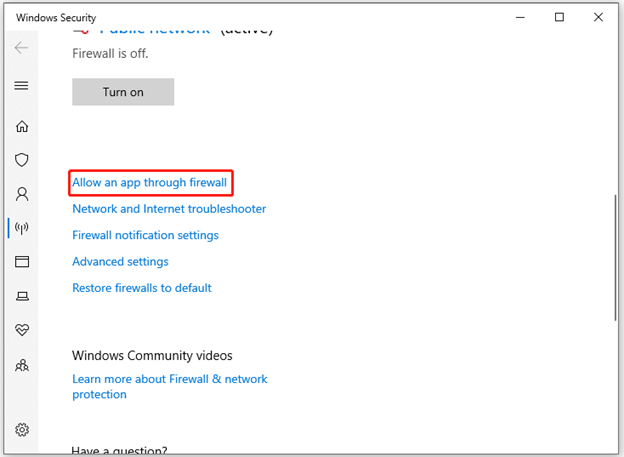
Step 3: Scroll down the content in the next window until you find the Allow an app through Firewall link. Then click on it to continue.
Step 4: In the pop-up window, click Change settings and then find GeForce Experience under the Allowed apps and features section.
Step 5: Click OK after you check GeForce Experience under the Private and Public tabs.
✔️ Solution 3: Update the Nvidia Graphics Driver
If the Nvidia graphics driver is outdated, you may receive the GeForce Game Ready driver installation can’t continue issue. To avoid or get rid of the issue, you should update your Nvidia graphics driver. Here are the steps for you.
Step 1: Press Windows and R keys to open the Run window.
Step 2: Type devmgmt.msc and hit Enter.
Step 3: Expand Display adapters, right-click on your Nvidia graphics driver, and then click Update driver.
Step 4: According to your demands, click Search automatically for drivers or Browse my computer for drivers. After that, follow the on-screen instructions to finish the process.
✔️ Solution 4: Free up Space to Store New Driver Update
It is likely that the “GeForce installation cannot continue” issue occurs because of insufficient space for the driver update. Though the amount of required space is small, it could be an issue if you have a low-capacity hard drive. Then you can delete unnecessary files/folders/programs on your hard drive to free up space.
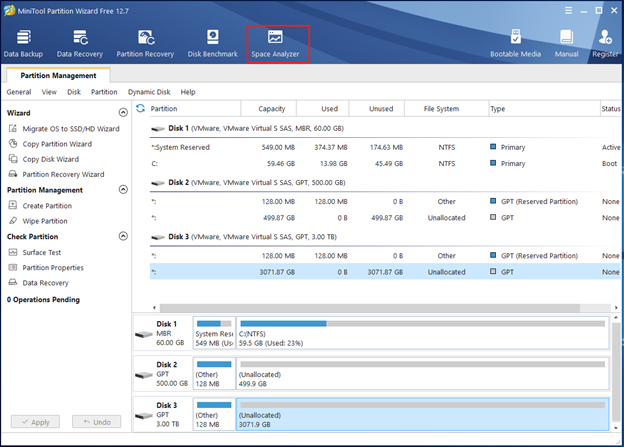
Before that, you need to find what’s taking up space on your drive via the Space Analyzer feature of MiniTool Partition Wizard. To be specific, this function will tell you the percent and even the exact space of each file/folder occupying your drive. The steps below show you how to find the space-consuming files/folders and remove them to free up space.
Step 1: Download this partition manager software from its official website.
Step 2: Run the downloaded setup file and follow the on-screen instructions to install MiniTool Partition Wizard.
Step 3: Launch this app and then click Space Analyzer.
Step 4: Select the drive letter of the target partition and click Scan. The software will display the result after the scan process finishes.
Step 5: Right-click on the large and unnecessary file/folder and tap Delete (to Recycle Bin) or Delete (permanently) option.
✔️ Solution 5: Reinstall GeForce Experience
If there are issues with GeForce Experience, uninstall it and then reinstall it from its official website.
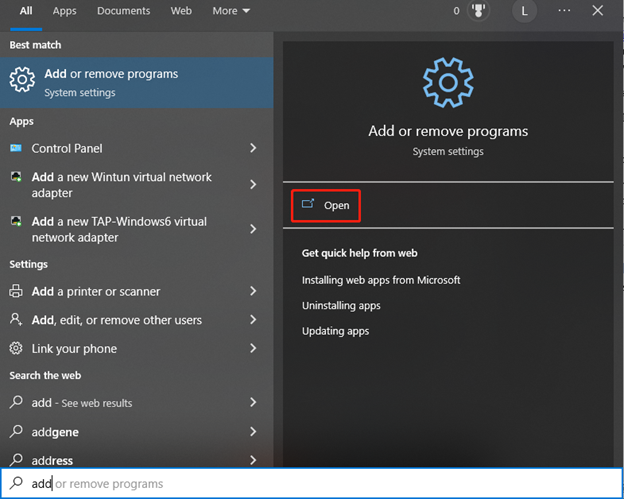
Step 1: Enter add or remove programs in the search box and then click Open in the right panel.
Step 2: Find and click GeForce Experience in the elevated window, then click Uninstall. If necessary, tap Uninstall again to confirm the operation.
Step 3: When the uninstallation process completes, go to the official website of GeForce Experience and download it.
Step 4: Run the downloaded setup file to install the application.
GeForce driver installation can’t continue? There are 5 troubleshooting methods for you. Pick one from them based on your condition.


.png)

No comments:
Post a Comment